Welcome, one and all, to my very first tutorial! May I just give a shout out to all you bloggers I love but don't know personally who make posting a tutorial seem so effortless? I applaud you, bloggers. **clap clap clap**
Okay, moving on! What is a thread catcher, you say?? Why, it is an essential for any sewer, scrapbooker, or lover of a place to put stuff. I bought one at a Farmer's Market in Logan many years ago before I truly became a sew-aholic. I thought it would be a good garbage bin for my paper scraps when I scrap booked. Later I threw it on the arm of my couch and placed my remotes in it. When I was commissioned to sew a thousand (okay, 16) skirts for our production of "Crazy For You" in 2005 I pulled out my thread catcher and a love affair ensued. It is a weighted pin cushion and garbage bin in one and it is one of my favorite sidekicks when I am sewing up a storm and I am going to teach you how to make one!!
**WARNING: THIS IS A PICTURE HEAVY POST**
I can't help it- I feel it's the best way to explain the steps and, besides, the fabric was sooo pretty I needed to see it over and over (and over) again!
Readers, meet, the thread catcher:

Beautiful, eh??
Kay, what you will need is one 16 1/2 X 8 1/2" (A), two 6 1/2" squares (A1), and two 3 1/2" squares (B) of your main fabric. Then cut two 6 1/2" squares of junk fabric (C) ( you won't see these- they are to line the pin cushion). Finally, you will need another 16 1/2 X 8 1/2" (D) piece of your lining fabric. You will also need wheat, rice, or Polly Fill, as well as 17" of Belting. Now, get your basic sewing supplies (scissors, machine, matching thread etc) together and let's get crackin'!!

First, please allow me to introduce Susan. She's my Brother XL-3750. She's a good girl (mostly) and has served me well. She's no Bernina or Janome, but for the most part she gets the job done!

Your starting lineup of fabric cuts. (My fabric all came from "JoAnn Fabrics")

Start by sewing together your two 3 1/2" (B) squares right sides together down the sides.

Turn and press.

Fold (A) and (D) pieces in half with right sides together and short ends touching and sew down to make side seam. You will now have a stitched 8 1/2 X 8"-ish piece.

Press seam open.

Now sew a bottom seam.

This part is the trickiest part, but it's easy once you've done it. Press the bottom seam open by laying on your ironing board and flattening out the corners. This is how you will make the bag open up on the bottom.

Pin corner and mark a line 1 1/4" from bottom of corner.


Sew Along marked line and cut.


Now you have a lovely bottom!! (he he he- yes, I'm 10). Repeat this process for both A and D sections.

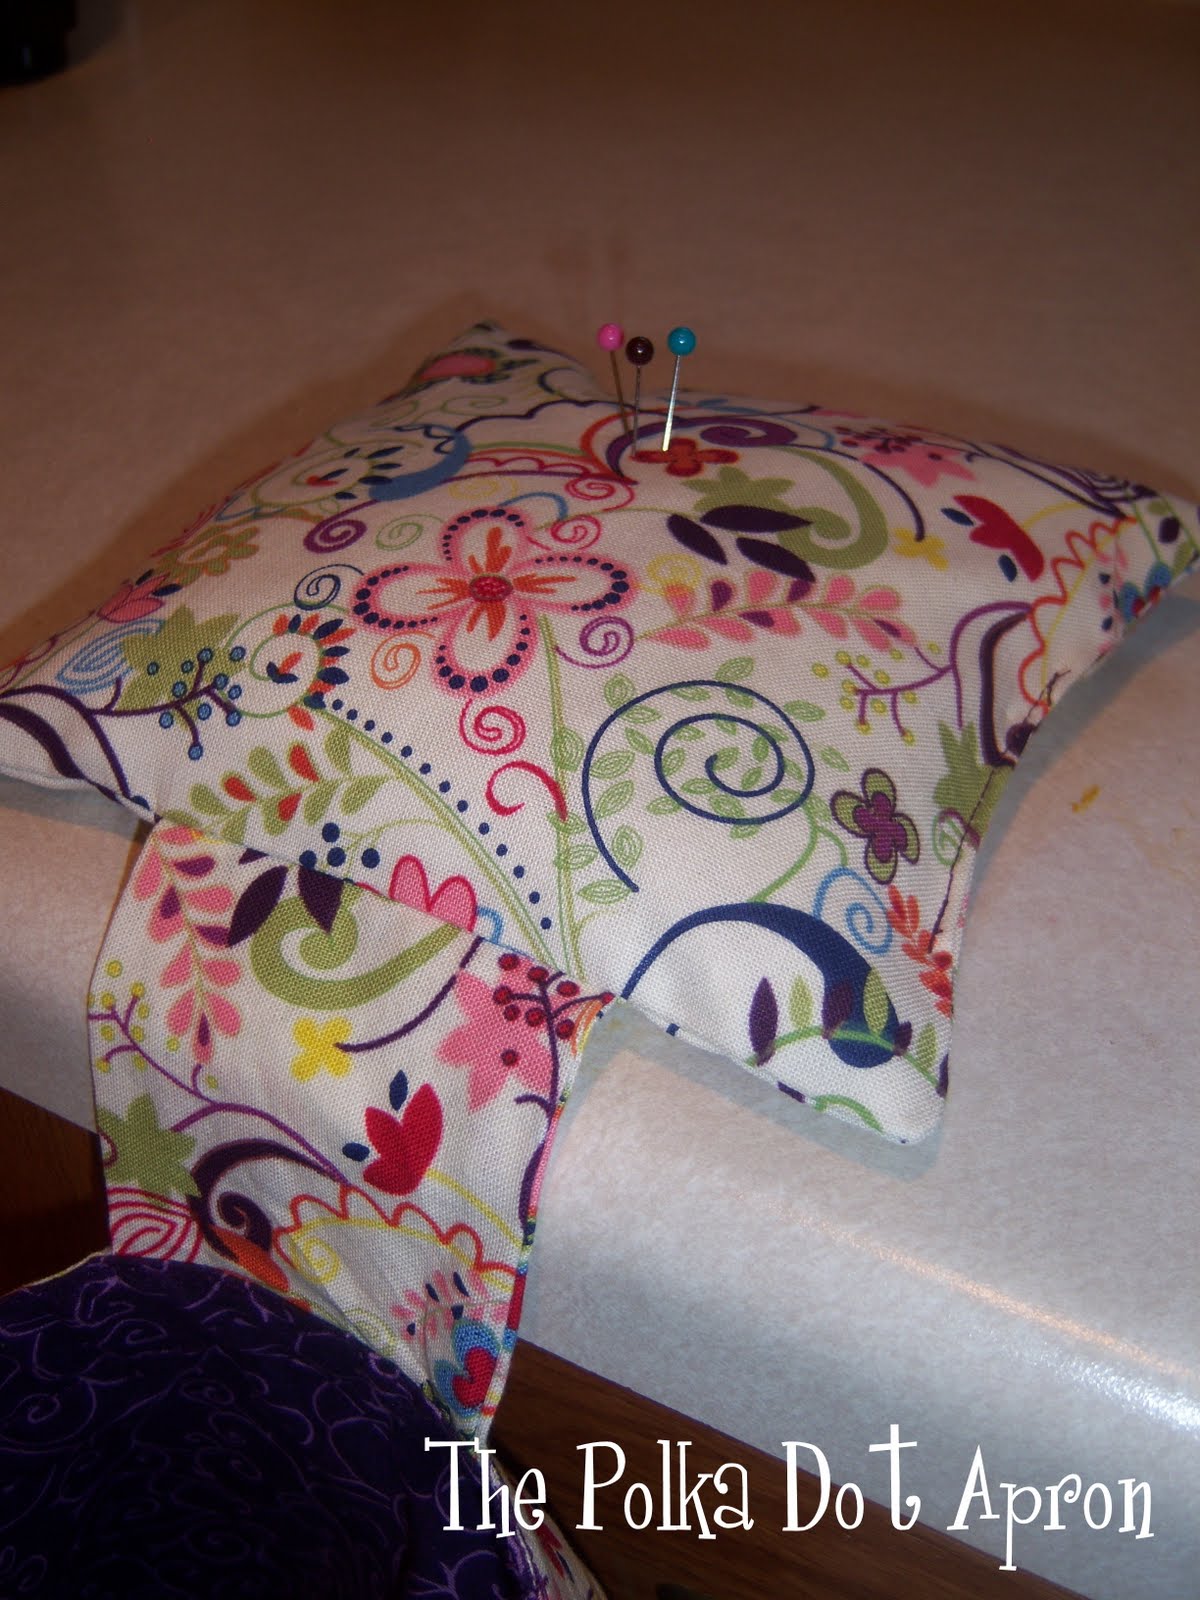
Place (A1) squares right sides together and lay Junk (C) squares on top and bottom. This will line your pin cushion and make it more durable.

In between the four layers center your finished (B) section and leave the end poking out (can you see it in the picture? It turned out a bit fuzzy)

Sew 1/4" around all edges, leaving a gap for turning out.

Turn and press and VOILA! There's your pin cushion!

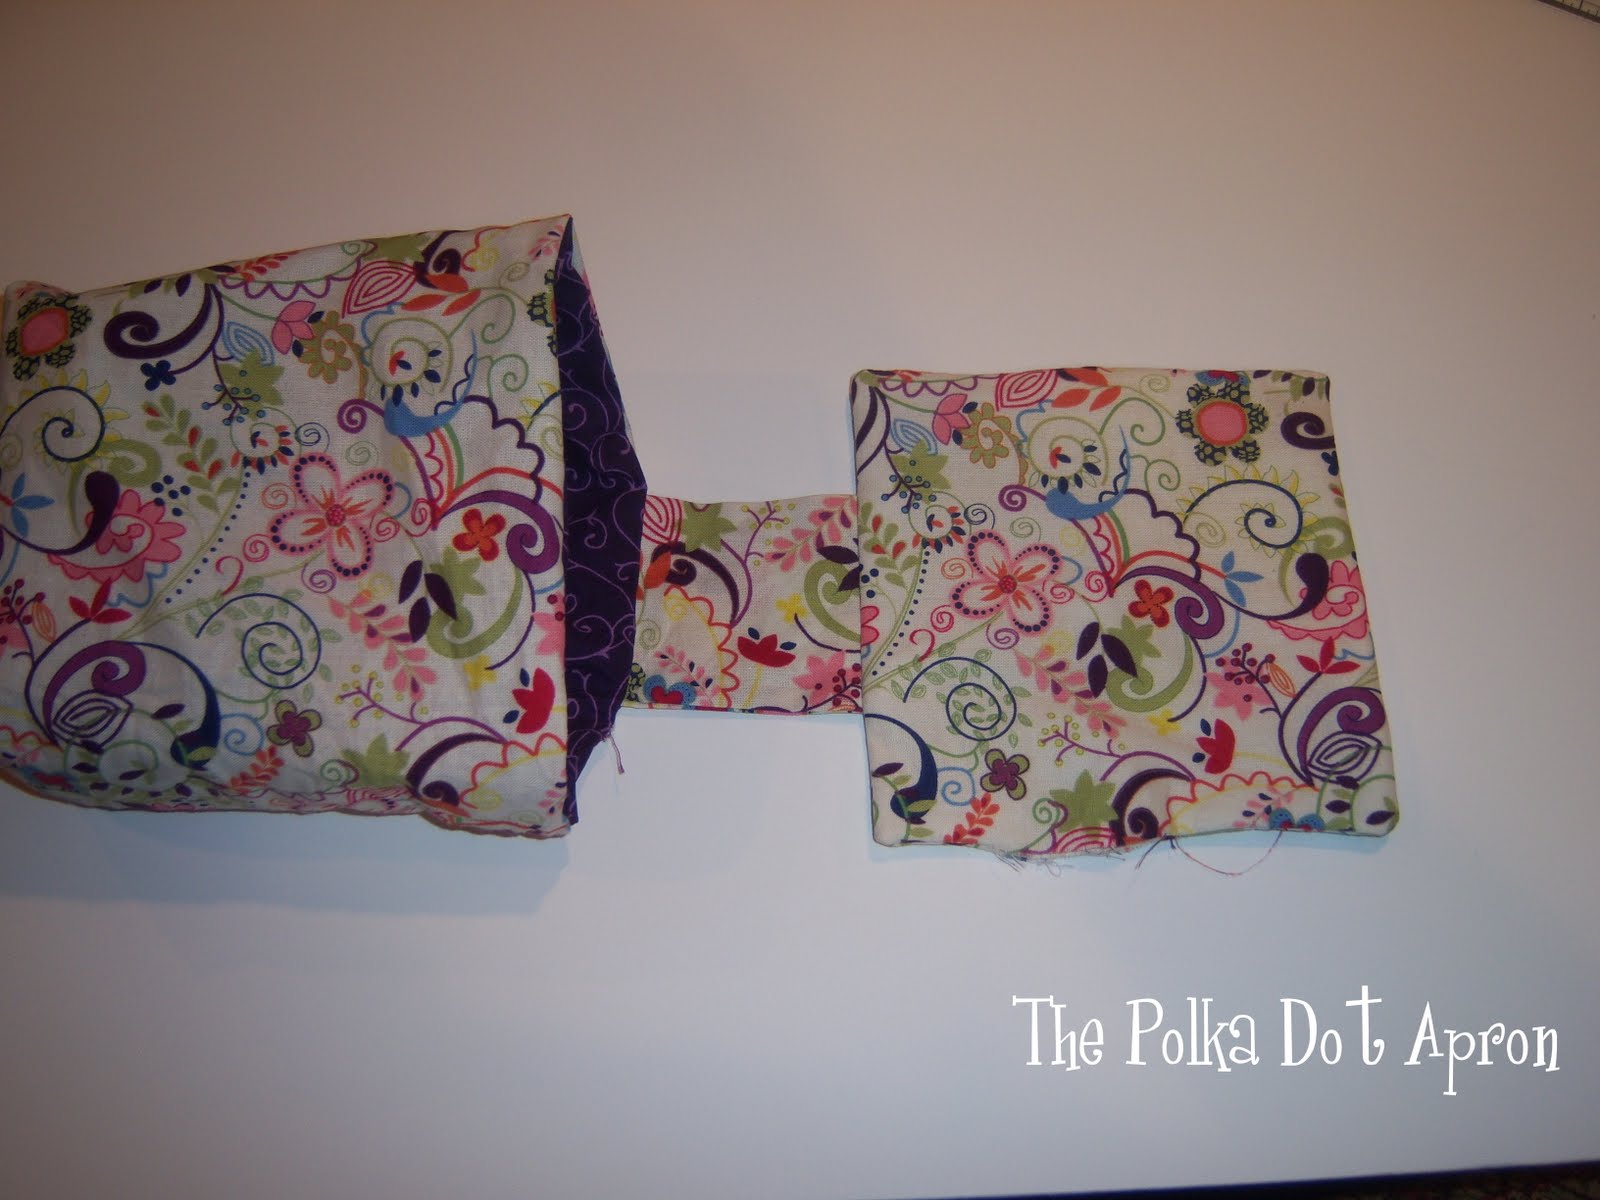
Now, laying your (A) piece flat with seam on the side and right sides still together, Mark the center (it should be around the 4" mark). Lay remaining edge of (B) strap centered over your mark. so the (A1) pin cushion is on the bottom (as in above picture). Place (A1 and B) unit inside your (A) bin (seen in below picture), matching center dots.


Now turn lining (D) fabric right-side-out and place in your Bin (A) so (A) and (D) are right sides together. Sew around entire opening, leaving about three inches for turning.

Turn and Press.
Holy Cow!! Did we just do THAT??

Now it's time to add your 'Belting'- (Just ask for it at JoAnn's- it's about $2.45/yard)
It is a stiff yet flexible band that you will insert into the top of your thread catcher to hold that puppy open. You will need about 17" for one catcher.

Stitch around the entire cylinder about 1 1/2" from the top

Insert the belting and loop it around. It is stiff enough that it should go all the way around with very little coaxing.


Now sew the two ends overlapping an inch so the belting is a 16" circle.

I know it's hard to imagine what a 'great' seamstress I am when you see that amazing stitch job, but please believe me- my son changed the settings on my machine while I was changing my other son's diaper! LOL

TADA! You now have a nice opening for your bin!

Now, stitch the top closed and run the stitch all around the top about 1/4" from the top.

Do you have much of this in your storage? If so, pull it out now! If not, you may purchase Polly Pellets or use rice.

I put my wheat or whatever I'm using in a 1 liter cleaned out water bottle so it is an easy funnel to use for the small opening in my pin cushion. Fill your cushion with approx. 1 - 1 1/2 cups of your filler and sew the opening closed. (I use my machine because I am lazy, but you can hand sew if you don't want your stitches showing!)
HOORAY!!! Look at the nifty sewing tool you have made. Give yourself a hand!

Please leave a comment and let me know how you find this tutorial. I am relatively new to this and would truly appreciate any constructive feedback. And when you have finished one, please send me a picture so I can see all your beautiful work. Happy Sewing!!
~Tabitha


That is a great tutorial and such a cute idea. I will have to go and make one it will come in handy. Just have to say Tabitha-You are Awesome!!! :0)
ReplyDeleteThanks for the great tutorial, appreciate all the pictures. I have been wanting to make one of these for myself and for gifts and finally did. Thought I would mention that I upcycled the flat plastic strapping band that comes on the outside of heavier packages that are shipped and used it in the bag opening instead of buying the "belting" that is used to help shape the opening...it works great!
ReplyDeleteThat strapping tape is what I use. If you get to JoAnn's on the day they get a truck, they will probably give you some as they take it off the boxes. I worked at Hancocks for several years and would take some home with me. It works great and was free.
DeleteThank you for the great tutorial! I am an inexperienced at sewing and had no trouble following your instructions.
ReplyDeleteHi. First time I visit your blog and I love it.
ReplyDeletethanks for the tutorial. love it. I'm going to make one for my self and for a friend.
God bless you and hugs from Puerto Rico.
Excellent tutorial, and the project is a perfect gift for friends who sew and craft. Thanks so much for posting it! D
ReplyDeleteyour post is great and very entertaining........Thanks <3
ReplyDeleteThanks for a great tutorial, I made one for myself and for my sister. They are far from perfect, but they will work. I showed them on my blog today. http://shaunas-world.blogspot.com/2013/02/getting-crafty.html
ReplyDeleteThank you! I didn't want to run out to the fabric store (too tempting!) so I used the stuff used to pleat drapery - kind of like stiff interfacing. It works great. Also, I was out of cheap rice so I used some really old black eyed peas that would have taken 16 years to soften up.
ReplyDeleteThis was great and so easy to follow. Thank you, they are adorable. :o)
ReplyDeleteHave always loved these little helpers. Now I can have one. Thank you for a great tutorial.
ReplyDeleteI like this idea. However, I would make the "pillow weight holder" larger; large enough to sit on as a cushion at my sewing machine.
ReplyDeleteLove it! I have made one pretty similar.
ReplyDeleteWhat a fabulous idea! I get so frustrated with my "tomato" pincushion as well as the pieces of thread that accumulate on my table. Can't wait to make one!
ReplyDeleteBeing a nurse I use oxygen tubing for the top. It stays open nicely with that. Aquarium tubing works well also
ReplyDeleteHi, what a great idea. Your tutorial is so easy to follow I will be able to make my own in no time at all. thank you very much.
ReplyDeletethanks for this, I made it today and it looks great!
ReplyDeleteGreat tutorial.....been wanting one of these for awhile....decided today was the day!! Instructions were wonderfully easy to understand. Thank you.
ReplyDeleteGreat tutorial, just whipped mine up in about 1 1/2 hours. I wish I could post a pic, cause it turned out SO great! Thank you so much, I am so pleased with my new thread catcher.
ReplyDeletep.s. I did not have any plastic lining for the opening, so I improvised and cut a strip of cardboard from a FedEx envelope, and threaded that through the opening. It actually worked great, and I recycled something that was headed for the trash =)
you can use the metal/aluminum measuring tapes you can get at the dollar store, cut it with scissors-I round of the ends to prevent poking me or the fabric. just insert and overlap couple of inches, it will stay. same metal tape for those "snap" make up bags.
ReplyDeletethanks for the tutorial
Thanks for sharing! I linked your tutorial here: http://nur-noch.blogspot.de/2014/08/nahen-furs-nahen-sewing-to-sew.html
ReplyDeleteI only starting sewing a week ago and my sewing machine turn up Thurs yippee!! I was desperate to make this and have just got to sew the pieces together but this is amazing, thanks so much for postin I'm :)
ReplyDeleteFrustrated! Directions weren't clear enough for me. This step: "Fold (A) and (D) pieces in half with right sides together and short ends touching and sew down to make side seam. You will now have a stitched 8 1/2 X 8"-ish piece." It should say fold one (A) and one (D) piece together, I sewed them both together and didn't realize what was wrong until it said to repeat. Ready to just buy one on Etsy. Directions need some editing.
ReplyDeleteI made the same mistake....yes you fold piece A and sew it..and then fold piece D and sew it...now you have 2 separate pieces...time to go find my seam ripper
DeleteLoved this tutorial! I have made a bunch of these for my sewing friends. Thank you so much!!
ReplyDeleteGreat tutorial! Now I can make some of these for next Christmas.
ReplyDeleteGood tutorial! I made one today. Although I made a couple of mistakes that required do overs, in the end it turned out nicely. Thank you!
ReplyDeleteThanks for the great tutorial. I just made one for myself. I love it.
ReplyDeleteWould love to teach this to some newbie sewers! Looks like a great project to teach them after they learn to use their sewing machines.
ReplyDeleteGreat tutorial. can't wait to make some.
ReplyDeleteThanks
Great tutorial. can't wait to make some.
ReplyDeleteThanks
Great tutorial! Love the pix, they really help the process along. Kudo's on your first tutorial.
ReplyDeletesuch pretty and delightful aids to stitching I think surrounding ourselves with beauty is very important...and these are beautiful. Each one unique and clever and even practical. I don't think it gets any better. Creative Bliss Dear.
ReplyDeletethread buy
Making one TODAY ! Thank you
ReplyDeletemade it ! love it !
ReplyDeleteI really enjoyed making this. My finished product looks great. I really appreciate your time taken to share this. For improving your tutorial: mention approx. space that you need to leave for turning out when you sew the pincushion part together (I'm a beginner and left too little...grrr!). Use completely different colour fabrics for each part so it's easier to see in the photos what is happening. Tell us what seam allowance you used.
ReplyDeleteI don't know if you will get this . .. THANKS! I am going to make this! Your tutorial is great for me
ReplyDeleteI can't tell if you blog is still active. But from what I have seen so far, it's great!
Thank you so much for the tutorial.....so well done for someone who is not too confident with the sewing! Just the instructions that I needed! Will be trying this soon....
ReplyDeleteThis is my new favorite sewing accessory! Even my mom says it is so handy! Thank you so much!
ReplyDeleteThank you for your very easy to follow tutorial. I agree it was long but very necessary.I would like to share my pictures. Where do I put them? I have shown your work to my italian friend and translated the measurements. So if you need this information translated....?
ReplyDeleteNice idea using the "belting" as boning! If you can't find belting, use PVC pipe plastic strapping from Home Depot. Can't remember the length (2 yds, maybe?) at approx. $3.50/pkg.
ReplyDeleteI guess I have selected a mind blowing and interesting blog canaryreviewzone
ReplyDeleteI cannot find my free print so i can copy it
ReplyDeleteDo you mean to say boning instead of belting for the top of the bag on the thread catcher? There is no support in the belting. I compared them at Joann's.
ReplyDeleteI think you have a great article here, But let me share with you all here about my experience with a loan lender called Benjamin Lee who helped me expand my business with his loan company that offered me a loan amount of 600,000.00 USD which I used to upgrade my business months ago. He was really awesome working with him because he a Gentle man with a good heart, a man who can listen to your heart beat and tell you that everything will be OK, when I contacted Mr lee it was on my Facebook page that his advert came up then I visited his office at Michigan to discuss about the loan offer that he and his company render, He makes me understand how all process go then I decided to give a try to it was successful just like he promised, yeah I believe him, I trust him, I rely on him as well about all my project he will be my dear financial officer and I'm glad my business is probably going well and I'm going makes my business growth like grass with his help.he work's with a great investors and guess what? They also give international loans. Is that not awesome to hear when you know a lot of business project are growing up each day by day in your heart hoping that you going to make income of that job to raise money for the project, Ops, then Mr Lee will help you with that, Yes international loan he will help you with that perfectly because I trust him very much for that kind of job, Look don't be shy or shaded give a possible try to Mr lee here his contact : 247officedept@gmail.com
ReplyDeleteI used sew in boning and added BBS to weigh the pin cushion down so it doesn’t fall off the arm of the chair or couch
ReplyDelete